| By: Scott
Fratcher - Marine Engineer/Captain
An engine analysis is an advanced system of inspecting our
boats drive train. We perform these tests to help catch pending
mechanical issues before we leave the dock. An analysis is much
more comprehensive than a typical “pre-departure peak”
at the engine. We are going to not only visually inspect our engine,
but also take a series of measurements that become our baseline
for future tests. Our goal is use this engine analysis as a system
to help make easy informed decisions about our boats drive system.
To begin you should have on-hand as much of the following as
possible:
- · Camera
- · Notepad
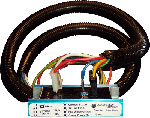
- · Your collection of electrical meters
- · A 0-3 bar pressure gauge (if your engine has a turbo)
- · An infer red temperature gauge
- · Any other special tools you might have
- · A few rags, and spray cleaner
The steps to performing an engine analysis:
1. Visual inspection
2. Pre inspection
3. Bollard pull
4. Analyzing the numbers
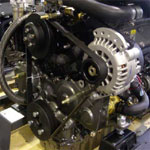
Visual inspection
This is a general once over of the engine looking for blatant
flaws.
Open the engine room door, look, feel and smell
Look for oil drips or other fluid under the engine. Inspect for
obvious cracked hoses. Give a gentle bend where a hose attaches
to the engine and look for cracks in the rubber cover. Check the
fan belts for cracks and loose hose clamps. Grab the alternator
pulley and see if it will spin free on the belt. If it does then
the belt is worn or loose.
Feel the inside of the engine room for oil film. Touch the areas
of the engine you can’t see feeling for rust or salt trails.
Smell for any burned chemical type odor. Smells can be difficult
to locate, but in general any burnt, oily, or diesel smells should
be searched out. A good nose can tell the difference between a
hot belt and a hot wire.
Look over the complete engine for oil leaks. Pay particular attention
to the front seal, and the area between the gearbox and engine.
Leaks in the front or rear seal can mean a coming engine rebuild.
Inspect the head to block connection looking for oil or water
trails.
Take photos from all angles as a base line for later use.
This is the point where many an engine inspection ends, but in
an analysis we want better scrutiny to help build confidence in
our propulsion system.
Our next series of checks focus on fluid inspections
Oil
Oil is the lifeblood of our engine. It lubricants, cools and
quiets our engine. But how do we know if the oil is doing its
job?
Begin by pulling the dipstick. Smell for signs of diesel odor.
Pinch a small dab of oil between your index finger and thumb and
expand slowly to see how far you can spread the oil before the
gap opens. Compare this gap to new oil and take down the difference
for your notes. This is a crude method of checking viscosity and
diesel intrusion.
Open the oil fill and look inside the cap for water droplets,
condensation or worse, a gray gooey substance indicating water
penetration into the oil. Put a small drop of oil on a paper towel
and compare it to a new oil drop. Note the amount of black carbon
and any shiny deposits.
A more careful inspection can include an inside look at the oil
filter. Next time you change oil keep the old filter. Leave it
to drain upside down then cut open the canister and look at the
inside of element. It’s the inside that will contain any
heavy deposits or worse, metal shavings. Take photos for later
comparison.
Immediately after start up note the oil pressure and again during
our bollard pull test and lastly immediately upon reducing throttle
after our bollard pull test. Does the gauge needle dip? It should
remain steady from start up and through all the following tests.
A dipping gauge can indicate a faulty pressure release, or worse,
worn engine bearings.
Coolant
A typical yacht engine has two cooling water loops, fresh water
and raw water. Lets look at the fresh water loop first.
Open the expansion tank cover or the heat exchanger cover or
where you check the coolant water. The reservoir should be filled
almost to the top with coolant. A low coolant level can mean a
small air leak in a hose.
Check the coolant for oil. It should look new and fresh. The
underside of the cap should be clean. NO brown gooey oil should
be present under the cap. Any strange colors can mean a failing
heat exchanger or failing head gasket or bad heat exchanger.
Our salt water system we’ll check by measuring flow rate
and using our laser temperature gauge to measure efficiency.
Diesel Filter
Locate your diesel filters. Most boats have two sets, one on
the engine supplied by the manufacturer and a set of pre-filters.
On the bottom of most any fuel filter will be a drain valve. Drain
off a small amount of fuel into a container checking for water,
dirt and any long stringy algae. If you find more than a couple
teaspoons of water or much dirt then it’s probably time
to change the filters. If your filter system has a vacuum gauge
then note the readings in the log for future comparison.
Engine control system inspection
The engine control system is what directs our intentions to the
engine and they are one of the most important inspections you
will make. If the engine fails to engage in reverse during docking
the results can be boat damage or worse.
Begin by feeling for play in the shifting linkage. Move the controls
through all possible motions feeling for “hard” spots.
Does neutral have a detent or “click” to tell the
helmsman he is in neutral?
Inspect where the cables attach inside the shifting housing.
Look at each split pin for wear. Wiggle and physically inspect
each connection looking for cracks, breaks, or anything that looks
amiss. Pay particular attention to where the cable cover end attaches
to the shift housing. If this point slips we will loose engine
control immediately.
Move to the engine and check the same cable ends, but this time
also searching for chafe from engine vibration. An area where
the plastic cable cover has chafed through can let in small amount
of water corroding our cable in areas we can’t see causing
an unpredictable loss of engine control.
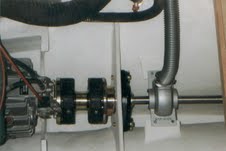
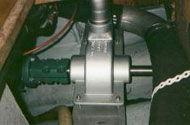
Gearbox and coupling
Inspect the gearbox to prop shaft flange bolts. Attempt to tighten
the Allen setscrews. Loose bolts or setscrews indicate a vibration
or miss alignment. Pull the gear oil dipstick. Check level and
perform our viscosity check again. Look for water under the cap
and smell for any burned odor. Most yacht gearboxes don’t
have a filter so any bits of crud or metal keep getting recalculated
so it is imperative we keep an eye on the oil.
Bollard Pull Test
The next series of test duplicate our engine working under load.
Were going to pull against our dock lines while safely tied in
the marina so can perform a series of inspections. This test can
also be performed at anchor if the boat is run hard in reverse
or while underway.
Note-It is imperative to inspect the dock lines, anchors, and
cleats for suitability for such loads. Double up your spring lines
and inspect the dock cleats. If you are testing a larger or higher
horsepower yacht consider getting underway for this test.
Tip-Locate the manual shut down on the injection pump and be
ready to shut the engine down if you suspect any problems or hear
shouting.
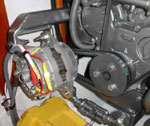
Start up check
Start the engine; wait a couple seconds for oil pressure to build.
Were gong to start our tests by checking alternator output. We
perform this test early while the alternator is still at full
output.
Increase rpm’s to 1000. Set your clamp amp to DC and place
the jaws around the positive/red cable at the back of the alternator.
Check the output and note the DC reading. Change the meter to
AC and again note the reading. The AC reading should be around
three amps. If the AC reading is near half of the DC reading this
indicates a faulty diode. Come back at the end of testing and
verify the voltage has stabilized around 14.2 volts.
Seawater flow test
While the engine continues to warm up increase throttle to about
2000 rpm’s in neutral. Take a bucket to the engine exhaust
and time how long it takes to fill. This number will come in handy
if you ever suspect a failing impeller, clogging raw water loop,
or clogged exhaust riser.
Begin our strain test
Wait for the engine to warm up (maybe five to ten minutes). Put
the engine in forward (reverse if this is a test at anchor). Slowly
bring the engine up to half throttle. Check all the dock lines
one more time. If all the lines and cleats appear strong then
increase the engine to full throttle. Note the maximum rpm’s
obtainable. If you have a handheld tachometer then compare the
engine results to the helm gauge. Note any difference so later
you can make an rpm correction table.
After maximum rpm’s have been reached reduce them by 200
for testing. For example a typical Yanmar might have a max rpm’s
of 3600, but would only reach 3400 pulling against the dock lines
thus should be run at 3200 rpm’s for the remaining load
tests. This way we are running the engine hard, but not overloaded.
Look at the engine mounts. They will be taking the thrust of
the engine and should be compressed forward. Inspect them for
any indication they are “rolling out” indicating a
coming failure. Even under strain the rubber mounted studs should
still sit vertical. Look for metal-to-metal contact in the base.
Note-At the end of the bollard pull test run the engine hard
in reverse and come back and check the mounts one last time. Take
photos of both forward and reverse thrusting mounts for later
comparison.
Smoke?
As the engine comes up to full temperature you might see signs
of smoke. Determine if the smoke is escaping from the engine or
if we are simply “gassing” off an old oil/dirt film.
Pay particular attention for smoke escaping from between the engine
and exhaust manifold. This may be combustion gas that could contain
carbon monoxide Carbon monoxide is a dangerous, colorless, odorless
gas that can kill when released into confined spaces.
Move to the back of the engine. Take a good look at the shaft
to gearbox coupling. It should be sitting almost perfectly smooth.
Any pumping for and aft motion could indicate failing engine mounts.
A circular motion could be a bent shaft, out of align engine,
or possibly damaged prop.
Look at the packing gland for the amount of water dripping past
the shaft into the boat. Compare this to the manufacturers recommendation.
Be sure to note the amount of drips over a sixty second period
and write this in the ship’s log as it’s a common
point for crew to worry about.
Temperature tests
By now the complete engine should be stabilized at temperature.
It’s time to do a few tests with our laser temp gauge. If
you have not used a laser temperature gauge before you’ll
be amazed at how much information this simple tool will show us
about our engine. (See Tradeaboat April for full use instructions)
Begin by scanning the gearbox looking for hot spots. Pay careful
attention to the area of the case around the clutch packs, and
the gearbox output bearing. If any part of the gearbox is going
to build up heat it will be during this bollard pull test. The
complete gearbox should be under 80C, and 60C is typical.
Continue checking with the laser gauge along the cylinder head.
It should show about 75-85C everywhere. There should be no hot
spots. A hot spot would be more than a five degree C change in
the head from one end to the other.
Note-Testing the area directly around the exhaust manifold does
not count as a “hot spot”, as this will be hot due
to the high temperature of the exhaust.
Check the oil temperature by shooting the oil filter or oil pan.
The oil temp should be about 7-10C above the head temperature
and not above 95C.
Check the inlet to the salt-water pump and outlet of the final
heat exchanger. With most engines the temperature difference should
be less than 10C. A higher temperature difference can indicate
an engine producing too much heat (IE failing head gasket) or
too little water flow (IE clogged salt water system).
Check the fresh water temperature inlet and outlet of the heat
exchanger. The difference should be about 10C and stable. You
should be able to move the laser along the body of the heat exchanger
and show the cooling effect of the heat exchanger. By this method
you can see how much reserve cooling you have left in the heat
exchanger.
The pre turbo exhaust temperature should be about 300-450C. After
turbo it should be a bit lower. Check the exhaust gas temp between
the cylinders and exhaust manifold for each cylinder. Normal for
a loaded non-turbo engine should be 300C. A cylinder temp lower
than the rest shows a clogged injector or maybe a dead cylinder.
A high cylinder temp possibly shows a leaking exhaust valve, or
poor injector spray pattern.
Crankcase pressure?
Locate the crankcase ventilation hose and feel the outlet for
crankcase pressure. If your engine does not have an easily accessible
vent line you can also check for crankcase pressure at the oil
fill. Slowly open the oil fill and check for “blow by.”
Blow by is a the amount of gas and oil mist that seeps by the
piston rings and pressurizes the crankcase. Excessive blow by
can mean worn out rings. You should not feel any pressure in the
oil fill. Testing with a gauge should not show above a pound of
pressure.
Note-Be careful opening the oil fill, this may release little
hot oil droplets being thrown off the rocker arms.
Turbo test
If the engine has a turbo, find a port on the intake manifold
and check the pressure. Compare this to the manual. Many turbo
boost up to 2 bars. Most Yanmar engines boost to 1.1 bar. The
pressure should be stable. Any cycling of pressure, or “coughing”
can indicate after burning, blow-by, or clogged air inlet.
Reduce throttle tests
Take one last look for any signs of future problems and slow
the engine down to an idle. Check with the laser temp to see if
the engine cools quickly (less than 5 minutes).
Verify the alternator is producing 14.2 volts. Less means the
voltage regulator needs to be inspected, and more may mean we
are cooking the batteries causing early failure.
Shut the engine down.
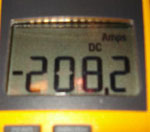
Load test starter
Place the jaws of the clamp amp over the positive cable leading
to the starter. Clip your voltmeter to the starter’s positive
and negative. Hold the STOP button, or manual engine shutdown
and then turn the engine over for ten seconds. (The engine should
not start.) Note the amp draw.
On a typical 40-75 hp engine the reading should be 225-275 amps.
Look at the starter for a rated amperage or wattage. (Watts/volts=Predicted
amps. They should match) anything more indicates poor cables,
a bad armature in the starter, or failing batteries. The voltage
during this test should remain above 9.5 volts. The results of
this test should be placed in the vessel log for future reference.
This is an important test as it indicates if the starter is about
to fail and helps trouble shoot later problems.
Pull the air filter and inspect for cleanliness. Reach a finger
down the air inlet. It should be lightly covered in dirty oil.
Any loose oil or splatter indicates a possible faulty inlet valve,
or maybe a turbo failing.
If the engine has a turbo charger you might be able to reach
inside and give the blades a spin. They should move easily with
no restrictions, or any “bumps”.
Conclusion
For most boties an in-depth inspection of the vessels drive system
can mean more confidence, safer travel and a much easier time
of finding trouble spots in the future.
Remember to keep careful records of all the tests performed so
in the future when something has changed we can repeat the tests
making short work of the trouble shooting and quickly get back
to enjoying the water.
Adapted from “How To Make Money
With Boats”
|
Engine
analysis and prepurchase incpection
.JPG)
Check hoses for cracks
.JPG)
.JPG)
.JPG)
.JPG)
.JPG)
.JPG)
.JPG)
.JPG)
.JPG)
.JPG)
.JPG)
.JPG)
.JPG)
.JPG)
.JPG)
.JPG)
.JPG)
.JPG)
.JPG)
.JPG)
.JPG)
.JPG)
.JPG)
.JPG)
.JPG)
.JPG)
.JPG)
.JPG)
.JPG)
Basic Fast Flow Emergency Bilge Pump Kit
$599USD plus shipping

Fast flow pump installed.
Always ready - Alwasy pumping
Pump arrives in parts for easy install. No need
to remove the prop shaft

Prop shaft bilge pump installed and ready for
use
Impeller blades split in two for easy install
and come in various sized to meet every boat's needs

Pump is ready for installation.
This is a safe boat with the Fast Flow propeller
driven bilge pump

Example of a propeller driven Fast Flow bilge
pump in operation
Fast Flow emergency bilge pump in position ready
to save the day
Basic Fast Flow Emergency Bilge Pump Kit
$599USD plus shipping
Order your books by Scott Fratcher here

Metal boat repair and maintenance. A must read for any steel boat
owner.
Print:
$31.10
Download:
$12.00
How to repair a steel boat without sandblasting. Special report.
Download:
$4.00

In order to get a good job as a marine engineer we need a marine
engineer licence, commonly called a Certificate of Competency
Print:
$39.49
Download:
$29.50

How to get a job on a mega yacht as a marine engineer? It can
be done without a licence.
Download:
$4.00

50 money making ideas run from a boat
Print:
$39.90
Download:
$39.90
Make money with boats? You bet! It's done every
day, but most people won't tell us how they did it. This book
is a tell all to give the layman the tools needed to start their
own onboard cruising business.
How to make money with boats has become an instant
classic selling around the world making dreams come true. If your
planning a cruise, or your know somone who is this is the perfect
book.
Print:
$39.90
Download:
$39.90

Print:
$21.37
Download:
$9.00
How to buy boats cheap? Dozens of tricks used
by adventurers around the world every day. This book is a must
read for anybody ready to purchase a boat.

Print:
$29.96
Download:
$9.00
The race was a heartbreaker, but eventually Earthrace took the
round the world speedboat record. This book is the log and blog
of the 2007 race where Earthrace set dozens of fastest ocean record
crossings.

Download:
$12.00
Earthrace in color. The same book as above, but in vivid color
to bring all the race moments right to the reader.

Print:
$14.97
Download:
$9.00
Anchor King is a narrative book of short stories of the Sausalito
California waterfront in the late 1980's. Anchor King contains
the award winning short story "Sex Toys?"

Print:
$115.47
Download:
$5.00
Tjalk Operator's Manual is an example of how
to build a yacht manual. Over 300 pages showing how to drive a
twin engine, single rudder vessel and much more.
|