On the fly repairs made at sea
Repairs away from land can be especially challenging. Limited parts,
lack of technical support, a rolling boat, and remote locations can
mean new tests for the crew.
In this article were going to look at some repairs made by this years
Tonga fleet. While the repairs are interesting and in some cases
comical, they all have one thing uncommon. The crews were on their own
to “imagine” a solution to a complicated problem that would
affect the
remainder of their passage.
Let’s take a look at some of the more creative solutions to this
year’s broken gear list.
Busted throughhull
We have all been told to have a bung handy in case a throughull were
to fail, but after living through the experience we learned a few
lessons.
First the bung must fit two size holes-
The inside pipe diameter of the throughull
And the inside of the hull itself if the throughull were completely
gone.
In our case the throughull skin fitting disintegrated away leaving
a
full size hole in the hull. The bung that we had secured to the
throughull was meant to stop water if the valve failed or the pipe
thread broke thus our bung was too small to fill the complete hole in
the hull. That left one crew member standing on the hole to stop the
water flow, while another ran for the spare bungs.
Once the water flow was stemmed and the bilge pumped out we went about
making repairs. We were lucky this throughull failed while departing
New Zealand. The crew were able to walk to the local chandlery and
purchase a replacement.
To install the throughull in the water we made a gasket of sealant
on
the skin fitting and let it cure to about half hardness. This allowed
us to dive down and slide the throughull into the hull. A bung pounded
into the skin fitting stopped the water flow during installation and
gave us something to hang onto while the nut was tightened.
The repair took about two hours of labor and another six hours for
the
adrenaline to clear our body.
Lessons learned-Secure bungs to throughulls that fit the outside and
inside of the skin fitting.
Dive gauge explosion
Twenty five years ago my dive instructor told me, “Turn the gauge
away
from your face before opening the air valve in case it explodes.”
Fair
enough, but how often does a dive gauge really explode? This was my
first in hundreds of dives. The strange thing was the air pressure had
been turned on for almost 15 minutes before the glass face blew out
spraying shards of tiny glass particles bursting through the cockpit
missing our eyes by sheer luck.
On inspection it seemed as if the tiny tube inside the gauge that
holds back the tank pressure must have cracked allowing the full air
bottle pressure to escape into the area behind the glass inside the
gauge. Eventually enough pressure built that the gauge exploded.
Lesson learned? Even after the gauges have held pressure still keep
then turned away from your face.
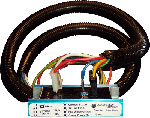
Repairing a shielded communication cable
A broken communication cable at sea can disable an otherwise working
piece of equipment. Sat phones, sonar, SSB radios, computers and many
more complicated modern electrical devices use shielded cables to
communicate.
In one case a crew member accidentally cut the transducer cable
leaving the boat “blind”. Another boat lost its radar when
a halyard
chafed on the radar cable till the radar failed to show echo returns.
The challenge was how to make a permanent repair of these delicate
cables while at sea.
On inspection it turned out the cable contained many inner wires, each
individually shielded with a second cover shield over the complete
bundle.
To make the fix we started by pealing the wires back and removing the
shielding to allow us room to work and solder the wires. Heat shrink
was slid onto the individual wires and the wires soldered one at a
time taking special precautions not to heat the wire to the point the
heat shrink began to “grab.” The heat shrink was then slid
to the
proper position and shrunk to insulate each wire leaving us with an
electrically connected wire cable, but needing the shielding applied
to each small wire.
For this task we used foil tape. Foil tape is metal tape with sticky
on the backside. We cut strips and wrapped them around each wire till
we had re-built the shielding. A sealing cover of heat shrink was
applied and the forward looking depth sounder tested. It worked the
same as before.
Tip-After soldering feel each wire for sharp bits of solder or small
strands of wire that have hardened and may poke through the heat
shrink shorting the cable internally.
Lesson learned-A soldering iron, different grades of heat shrink and
foil tape can repair a multitude of broken or chafed cables.
Hand bilge pump crack
Our new hand bilge pump handle snapped after a single use. On land
this would simply mean an inconvenient trip to the chandlery, but at
sea the ramifications were greater. This hand pump was the only way
we
could de-water an isolated compartment that was filling due to a deck
leak.
To make the repair we considered glue, but determined the thin
slippery plastic would not provide suitable “grip” for the
glue to
hold. We decided on a mechanical repair and cut the head from a bolt.
The remaining stud was then “threaded” into the broken shaft
and the
handle drilled to accept the stud.
The repair held and the pump and is still working “good as new.”
Lesson learned-Not every repair and jury rig can be planned for. We
have to make do with what's aboard.
Hull disappearing
An aluminum boat crew were perplexed by the batteries going flat
without a known cause. The crew charged the batteries for hours but
they would simply discharge overnight. The batteries were exchanged
for new but still they would not hold a charge.
After careful inspection it was found a positive wire had come loose
and was lying on the aluminum hull thus charging the hull making an
electrical circuit. A current loop was formed and the bottom the
aluminum hull began to disappear.
The boat was hauled and the results shown in the photos. The damage
is
deep. In some places areas 400mm across were damaged two millimeters
deep. The damage took place over a matter of months.
Lessons learned-All stray current must be located and accounted for
(see “Stop the decay”, Tradeaboat Feb?) in a systematic
process. If
the owner had started the search for the depleted batteries with a
simple DC amp clamp the voltage leak would have been found straight
away. Instead guesses were made as to why the batteries were
discharging. These “conclusions” almost cost the life of
the vessel.
Spare fuel tank crack
Our boat carried a spare 500 ltr fuel tank to provide extra motoring
range. This plastic tank has been carried off and on the vessel for
the last few years, but stored in a garage for the last six months.
We
collected the tank, gave it a quick inspection and tied it to the aft
deck. All seemed fine till we tried to fill it. Luckily a crewmember
noticed the crack at the last moment before a serious mess was made.
Lesson learned-I suspect this tank was built for water, but has been
used for diesel instead. This unintended use of the tank caused a
hardening of the plastic that eventually resulted in a crack. The
lesson is to verify the suitability of containers for the intended
use.
Water maker failure
Our computer controlled water maker was turned on in port. After a
short flush the lights turned green symbolizing clean fresh water was
being produced. Satisfied, we turned off the desalination system till
we were in clean water.
A few days away from land we turned on the water maker and filled our
two 400 liter tanks. Later in the day we poured a glass of water only
to discover our tanks had been contaminated with brackish water. In
an
instant we went from luxuriating under a hot shower to a survival
situation. Our spare fifty liters of fresh water would get us to
Tonga, but our trip would not be nearly as comfortable.
We were left with two important questions-
Why did the water maker’s electrical meter show good clean water
when
in reality it was pumping brackish water
Was there a way to fix the problem at sea.
On inspection of the system we found the fresh water sensor to be two
probes that measured resistance of the product water. The probes had
become dirty over the last few years increasing the measured
resistance thus giving the false low salinity reading.
To make a temporary repair at sea we tested the product water from
each membrane separately. We found one membrane to be producing fairly
good water while the other was pumping the poor water into the tanks.
We routed the “bad” membrane to a deck hose that we used
to rinse the
sea salt while the almost “good” membrane was used to supply
drinking
water.
Note the fix to shut off one membrane. We did not have the fittings
onboard to re-rout the water tubes so we closed off the plastic tube
by heating the end over the stove till the plastic went soft then
folded the end over on itself and wired it shut.
Lesson learned- Even if the salinity gauge tells us we have good clean
water it’s still worth a taste of the product water to verify
the
quality. Second, water makers with more than one membrane give the
crew options when failures occur.
Exhaust system leak
Motor-sailing along over a calm sea the engine room bilge pump
activated. On inspection we found a steady stream of water entering
the bilge. We followed the water upstream till we found an exhaust
elbow leaking a steady stream of water into the bilge.
My first thought was the metal elbow has corroded through, but on
inspection we simply tightened the hose clamps and the leak stopped.
Lessons learned-Regular engine room and void inspections catch these
leaks early on. If the engine bilge pump switch had failed the crew
might not have been notified of the leak till the compartment filled
to the point of flooding the engine. This could have become a
situation where one failure causes the next that eventually leads to
an expensive repair or stranded vessel. A quick glance into each void
during a watch can prevent such a disaster.
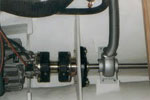
Packing gland leak
A Danish steel yacht was sailing from Tahiti to Tonga when their shaft
packing gland began to drip. The drop turned to a dribble that became
a flow and the vessel was in peril. The crew tried to wrap the gland
with rags but the flow continued. They stopped the boat and jumped
over the side and attempted to stem the leak from the outside, but the
fix disabled the engine.
Laying in his bunk at night the captain realized the leak was caused
by fatigued rubber in the ten year old shaft seal. At morning light
he
removed all the rags and put a single hose clamp over the seal. By
adjusting the hose clamp he was able to provide the exact amount of
force to stop the water flow, but allow the use of the motor.
Lessons learned-Critical systems such as “drip-less” packing
glands
need inspection and service. This packing gland provided trouble free
service for over ten years before beginning to leak. Strangely, the
engine and propeller were bought new two years ago, but the original
packing glad had been left in place to save money. Eventually this
“savings” caused the leak.
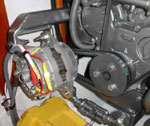
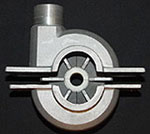
Injection pump leak
This generator engine began dripping diesel from the injection pump
seals. We suspect this leak may have been caused by the new low sulfur
diesel fuel. The manual clearly states that we should pull the
injection pump and send it to a qualified shop for repairs. This is
an
easy statement to make, but impractical when our boat is in the
islands far away from services.
To make repairs we first had to find the exact location of the leak.
We cleaned the complete injection pump by spraying soap over the area
and drying with rags. With good light we turned on the fuel and
watched till we saw the leak appear from the injector cylinders. We
carefully dissembled the pump working our way toward the O-rings.
It must be stressed that cleanliness is of the utmost importance. Any
small debris, paint flakes, or rag lint will be forced directly into
the injection system to end up clogging an injector.
We found O-rings left on a workbench in a local shop and made the repairs.
Tip-When working on an injection system you might come across special
bolt heads, such as the five-sided bolts shown in on this injection
pump. The special bolt heads tend to be securing internal adjustments
in the injection pump. In this case the five sided bolts control the
rotation of the injector sleeve that regulates the peroration of fuel
sent to each cylinder. It’s critical not to change these adjustments.
Lessons learned-O-rings are a standard of the industry. Without a
universal O-ring kit we were at a disadvantage in making our repairs
leaving us searching through local mechanic’s dirty spares kits
for a
clean suitable O-ring.
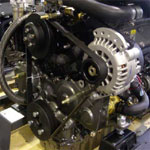
Engine blowing black smoke
A yacht crew were motoring into a headsea when they noticed the
exhaust began to turn black. Soon the exhaust was blowing big clouds
of black smoke. They slowed down and the smoke cleared, but after a
few hours again the smoke began to appear. Eventually they were
running at dead slow and the engine had no power.
On inspection it was found the engine air filter had completely
clogged to the point it imploded and collapsed. The air filter was
removed allowing a giant inrush of air and the engine ran smooth
again.
Lesson learned- Basic engine inspections would have caught this
clogged air filter long ago. If a boat is heading offshore the crew
must take a few minutes to go over the basic systems.
Flooded laptops
A deck scrub with forgotten open hatches below caused two laptops to
fill with water. Luckily it was fresh water that deluged the computer
The procedure used to clean and repair the computers was to-
Imeadetly pull the batteries
Stand the computers on their side
Open all the access ports that normally give access to the hard drive,
RAM, and other accesaries.
Set the computer in the hot sun or use a blow dryer to remove the last
of the water.
Wait as long as possible before testing the computer. It only takes
a
leftover drop in the wrong place to destroy a circuit board.
Lesson learned-Check the ports before rinsing the deck, but more
importantly don’t store water sensitive items under any hatch
as it’s
only a matter of time before an expensive mistake is made.
|