Today’s fuel prices are forcing many boaties to look
for alternative methods of battery charging – ones that
don’t use fuel. Scott Fratcher explains how to build your
own wind/trolling generator to produce “cost-free”
battery charging.
The wind/trolling generator presented here has been the energy
producing workhorse of the cruising community for over two decades.
It’s compact, has many mounting variations to suit different
yacht rigs, and puts out heaps of power.
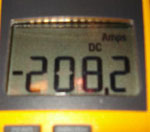
We regularly see 20 charge amps in 25 knots of wind. Sailing at
six knots the trolling generator produces six continuous amps,
with a drag load of 15 kg. The wind charger is the quietest I’ve
ever heard, and best of all it can be built by any good DIYer
in just a couple days.
Four steps to building the generator:
* Finding a motor
* Build a propeller
* Build a trolling attachment
* Put it all together and make power
Finding a motor
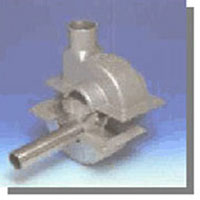
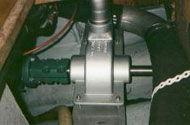
The heart of the wind/trolling system is the motor. This is the
only component you might actually have to purchase. Because this
is a DIY article, we’ll discuss specifications to help you
find one of these motors in the scrap bin, or at least know to
what to look for at a swap meet.
For years boaties have used old mainframe computer tape drive
motors (permanent magnet motors). There are lots of them around,
now that computers have moved to hard disks. You can often find
them at swap meets, and military surplus stores sometimes have
them. You can also search the internet.
Specifications
We want a permanent magnet motor between 18-48 volts, with an
rpm range of 200-600. The higher the voltage the more leeway you
have on rpm. The idea is to produce over 14 volts at low rpm (200
or so). For an 18-volt motor to make 12 volts it has to spin at
66 percent of its rated rpm. For a 48-volt motor to produce the
same 12 volts, it only has to spin 25 percent of the rated rpm.
To identify a permanent magnet motor, look for the smooth case
sides, with bearings at each end. There should be no cooling fans
or openings to the windings. The sealed case means the windings
also last longer in a marine environment.
Testing
When you come across one of these motors, give it a quick “on
the spot” test by turning the shaft. If the shaft rotates
smoothly and looks to be in good shape, the next step is to cross
the output leads. Again spin the shaft and you should feel instant
resistance. If you don’t feel the drag it could mean loose
or worn brushes, a burned-up armature, the rpm rating may be too
high for this application, or it may not actually be a permanent
magnet motor.
The second test is to connect an electrical meter to the generator
output leads and give the motor a good spin by hand. A quick snap
of the wrist should render a short but readable voltage of 10
volts or more.
Note: If you attempt to turn the generator shaft and feel a grinding
on the inside of the motor, the magnet may have fallen off the
case and stuck to the inside windings. It’s an easy fix
to open the case and use some epoxy to replace the magnet. Pay
careful attention to the direction the magnet is pointing when
you remove it for cleaning and re-gluing.
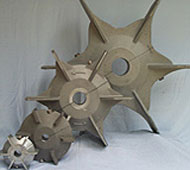
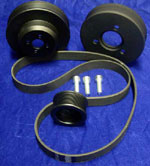
Building a wooden prop
The prop changes wind flow into torque. Building an efficient
wind generator prop can be challenging, but it’s always
rewarding. The blade needs three separate qualities. It must:
- spin fast in a good breeze to produce high top amperage
- still produce amperage in light winds
- have enough torque to overcome the starting resistance to begin
spinning from a dead stop.
The super quiet prop shown here has been kicking around the cruising
world for years and is a good balance between the three aspects
of design criteria. And it’s short enough to hang in the
rigging.
Once the prop’s completed it must be balanced to prevent
vibration when in use. Check balance by laying the center over
a knife blade. Slide a small coin along the blade till a perfect
balance is achieved. The coin is set into the wood and glued in
place.
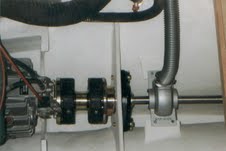
Rigging the generator
The most common mounting method is a rope harness which hangs
the generator in a “triangle” configuration with springy
lines. Springy lines keep any noise from being telegraphed back
into the hull. Hung in this manner with a good, balanced blade,
one can hardly hear the generator spin. The rope harness is attached
to the generator motor with the use of big hose clamps and a tail
is made from a piece of plywood.
Another common method is mounting the generator on a pole on the
aft deck. I don’t like this system because the noise vibration
is “telegraphed” into the hull, so the charger can
be heard below decks. Those who use this system claim the wind
generator gets more use cause it’s always up and producing
electricity.
Trolling attachment
A trolling option uses a small propeller towed behind the yacht
(when sailing) that spins the generator. Find an old propeller
from a 10-15 hp outboard engine. A 9”x9” prop is ideal
for a yacht sailing at six knots. If your yacht sails slower,
look for a power prop like a 9” x 7”. If your yacht
sails faster, look for a 9” x 10” model.
To build a trolling option we start with a length of stainless
shaft (or even a piece of galvanised pipe) – 400 - 600mm.
We want a heavy shaft to keep the prop in the water at six knots.
Attach the prop to the shaft by welding a 13mm bolt to the shaft
and slide the prop over it. The bolt should be long enough so
a nut just captures the prop hub. Fill the area between the prop
and the bolt with epoxy and we’re just about ready to make
free electricity.
Rigging the trolling attachment
The idea is to use a double braid yacht line long enough to have
the prop riding firmly inside the second wave behind the yacht.
It takes a bit of experimenting to get the right line length.
If the line is too short the prop will pull free from the water,
snapping back toward the yacht – a bit like an attacking
buzz saw. If the line’s too long the prop will climb the
back of the wave and won’t deliver optimum charge. A good
starting length is 40m of 12 or 13mm sailing braid.
To deploy the trolling prop have the line laid in a big figure
eight on deck, with one end attached to the generator and the
other onto the prop. Drop the propeller into the water and pay
out the line quickly till it goes tight. The idea is to have no
drag on the line till it’s completely straight, helping
to prevent tangles.
Tip: Typical three-strand line is not suitable for a trolling
prop. The line can become “un-spun”, rendering it
useless. When it’s right, you should see two amps at three
knots, three amps at four knots, five amps at five knots and over
six amps at six knots. At about seven knots the prop begins to
shoot out of the water scaring the crew. The drag on the boat
is about 15kg at full load. Many yachts troll at night to supply
power for the running lights, reading lights, radar and any other
items that would normally cause the batteries to go dead. During
the day the trolling prop is pulled in and the fish lines deployed.
To recover the trolling prop, slide a big plastic funnel down
the trolling line. The funnel will follow the line till it hits
the prop preventing it from spinning and allowing easy retrieval.
Regulating output
Regulating a homemade wind generator can be a little tricky,
because it’s a passive system. The wind blows and they make
power. When a lot of wind blows they make a lot of power. If we
want to shut down the wind generator we can’t disconnect
the battery: the drag on the blade would drop to nothing and the
wind-generator blade will over spin. Instead, to reduce power
output in high winds we use a line connected to the tail and turn
the generator away from the wind.
Tip: A tape drive motor needs an inline diode to prevent back
spinning. Just about any alternator diode placed in the POSITIVE
generator output lead will suffice.
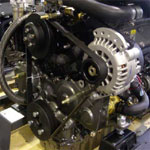
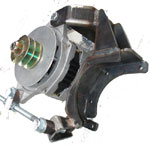
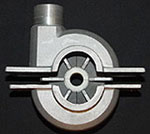
Alternator vs Permanent Magnet Motor
We can also use an old alternator for this project – but
it’s a bit trickier and involves rewinding and replacing
the inner components.
Alternators and generators both produce electrical power, but
the alternator tends to be more efficient because the electrical
current is produced by the outside windings while a generator
produces the power from the inner windings. Since the outer windings
have a greater diameter, they cover more area and thus can produce
more power for the same case size. A re-wound alternator also
produces your charge voltage at a very low rpm.
Up for a bit of an experiment? How about modifying the alternator?
Like all electricity-producing components, an alternator utilizes
two, interlocking magnetic fields. By moving the fields against
each other we produce electricity. In most alternators the “field
current” provides one of the magnetic fields. That’s
no good for a passive charger. We don’t want to waste four
amps producing field power – we’d rather have them
help charge the battery. So we’re going to replace the field
current magnetic field – with permanent magnets.
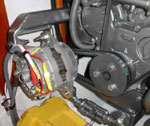
The steps to modifying a car alternator for use as a wind charge
motor are:
Pulling the alternator apart
Removing the rotor and pressing it apart
Removing the rotor windings and replacing them with round
speaker magnets
Removing the stator and rewinding it with wire about quarter
the size, with four times the wraps.
Old car alternators are easily obtained, as are old car speaker
magnets. So the only tricky bit is rewinding of the stator –
and we’ll come to that in a minute. First – the inner
rotor. Once you’ve pulled the alternator apart, the rotor
must be pressed open and the windings removed. We want to replace
the wire with round speaker magnets (old car speakers are perfect).
These round magnets have holes in the centre and we want to slide
them over the rotor shaft. The idea is to make a stack of these
round magnets that fill the space inside the rotor. They must
be stacked like-pole-to-like-pole (usually about four will do)
so the stack will try to push itself apart during assembly.
Re-winding the stator
The number of winding wraps in the stator is what produces the
voltage per RPM. We want a low RPM range of about 200-400, but
typical alternators start producing real current at around 1500rpm.
That means we need about three or four times as many windings
pushed into the stator. How do we do this? Start by examining
the stator carefully. You’ll see it’s really three
separate windings that combine at the diodes to become one charge
source. Remove the old copper wire and insulating paper. You should
now have a clean stator to begin the project.
Locate some new winding wire about a quarter the diameter of the
original windings. To form the wire to fit the stator many techs
use a block of wood ground by trial and error to the perfect shape
to fit the stator gaps. The plastic insulating material is simply
Mylar paper bought from a bookstore, and the restraining pieces
that hold the wire into the stator grooves are round wood dowels.
When you have laid the wire into the stator soak it all in varnish
and hang to dry.
If this phase of the project sounds too finicky, the stator can
be purchased separately, or a local alternator shop can rewind
the stator for your project.
Note-How to build a wind/trolling generator is continually updated
with new information. If you built a generator send me an email
and let me know how it went. Send photos and I'll post them on
this site to help others.
Anybody have a good design for converting an alternator
to a PM generator? Something past the experiment phase? I would
love to post the plans here.
Call now to book a 2010 vacation in
the South Pacific
Make money with boats? You bet! It's done every
day, but most people won't tell us how they did it. This book
is a tell all to give the layman the tools needed to start their
own onboard cruising business.
How to make money with boats has become an instant
classic selling around the world making dreams come true. If your
planning a cruise, or your know somone who is this is the perfect
book.
How to buy boats cheap? Dozens of tricks used
by adventurers around the world every day. This book is a must
read for anybody ready to purchase a boat.
The race was a heartbreaker, but eventually Earthrace took the
round the world speedboat record. This book is the log and blog
of the 2007 race where Earthrace set dozens of fastest ocean record
crossings.
Anchor King is a narrative book of short stories of the Sausalito
California waterfront in the late 1980's. Anchor King contains
the award winning short story "Sex Toys?"
Tjalk Operator's Manual is an example of how
to build a yacht manual. Over 300 pages showing how to drive a
twin engine, single rudder vessel and much more.


.JPG)
.JPG)
.JPG)
.JPG)
.JPG)
.JPG)
.JPG)
.JPG)
.JPG)
.JPG)
.jpg)
.jpg)
.JPG)
.JPG)
.jpg)
.JPG)
.JPG)
.JPG)
.JPG)
.jpg)
.JPG)
.JPG)